Friday, June 21, 2013

The First "Fruits" of My Labor

The First "Fruits" of My Labor

I harvested my first crop today! Ok, so maybe it's not considered a crop but I grew it in my own garden and you can eat it. I consider that a success... except I haven't tasted it yet.

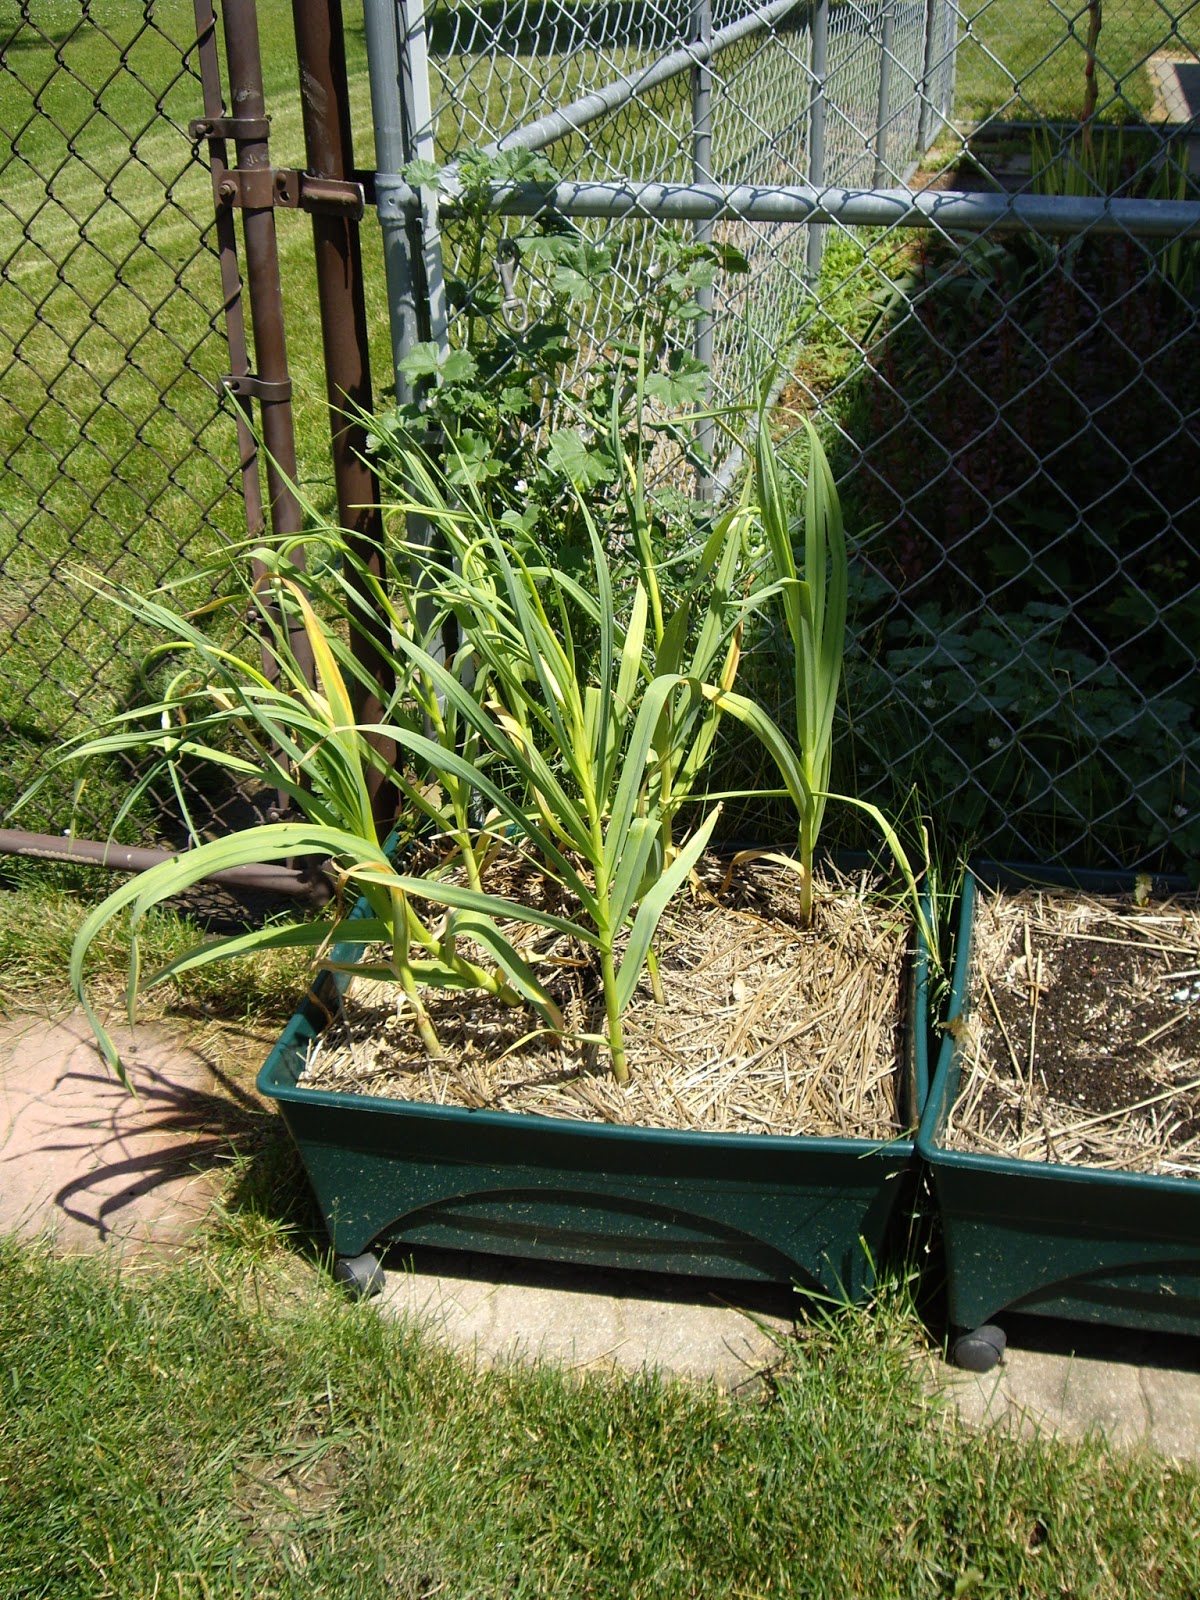
What am I talking about? Garlic scapes! Yes, those curly green things are garlic scapes. Basically they are the flower stems of a garlic plant. While that may not sound appetizing, as soon as I clipped the first one off I smelled the wonderful aroma of pure strong garlic. Yum!


I don't think I have ever tried a scape before so what do I do? Head to the internet! Well, send DH (dear husband) to the internet. He found this site which has a "garlic scape pesto" which sounded pretty good. The best part is that you can freeze it for later. That was important because I had already cut the scapes and didn't have many other ingredients on hand. (Oops!)


Recipe: Garlic Scape Pesto

Excerpted From “The Meat Lover’s Meatless Cookbook” by Kim O'Donnel by arrangement with Da Capo Lifelong, a member of the Perseus Books Group. Copyright 2010.

Ingredients

  • 1 cup garlic scapes (8 or 9 scapes), top flowery part removed, cut into 14-inch slices 
  • 13 cup walnuts 
  • 34 cup olive oil
  • 14 to 12 cup grated Parmigiano-Reggiano cheese
  • 12 teaspoon salt, or to taste
  • Ground black pepper

Here’s What to Do

- Place the scapes and walnuts in the bowl of a food processor and whiz until well combined and somewhat smooth. 
- Slowly drizzle in the oil and process until integrated.
- With a rubber spatula, scoop the pesto out of the bowl and into a mixing bowl. 
- Add Parmigiano- Reggiano and salt and pepper to taste.
 - Keeps for up to one week in an airtight container in the refrigerator. 
- Also freezes well; add the cheese after the pesto has thawed.
Makes about 34 cup.


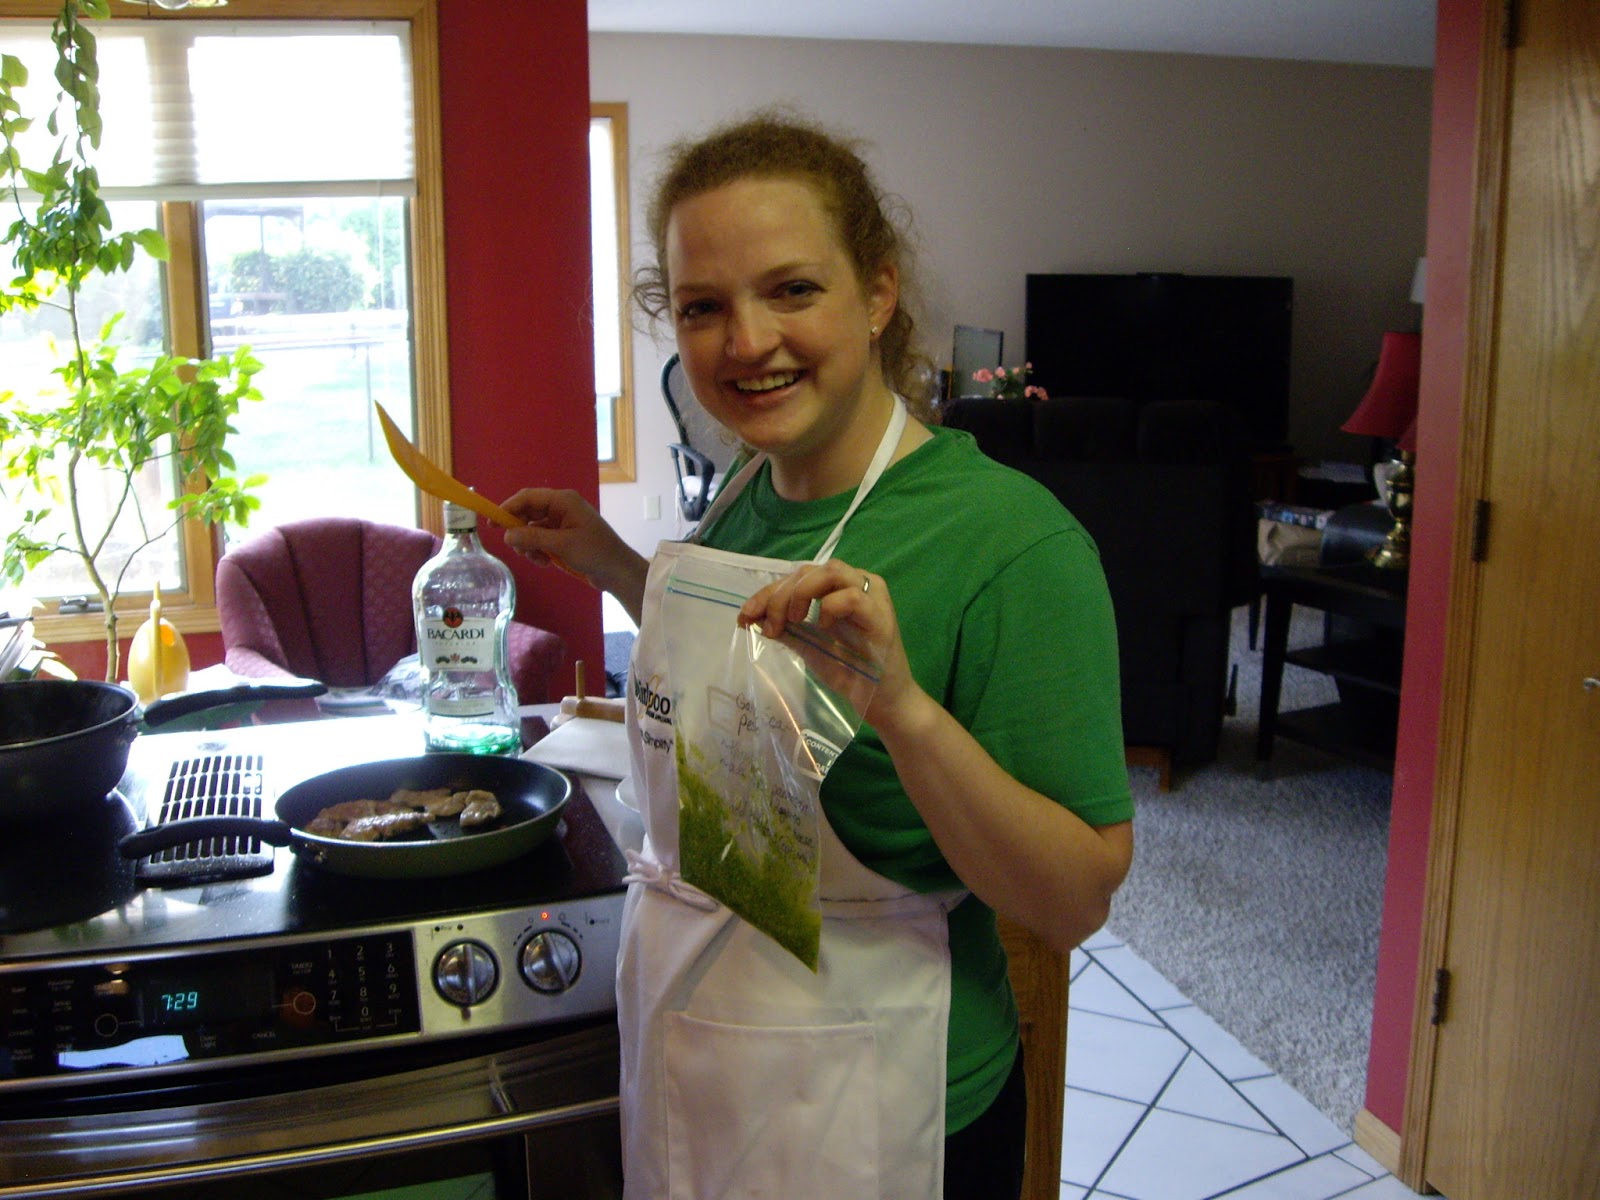
 It's just such a happy green color! I didn't add the walnuts because Mom is allergic. So really I just blended the scapes with olive oil, salt, and a little pepper. When I do thaw it, I will mix in the cheese. If any tomatoes are ready from my garden I may throw those in and eat it like a bruschetta!

Here I am with the garlic scape pesto in a baggie ready to be frozen!


You may be wondering what else I am cooking there since the pesto isn't heated at all. About a month ago DH and I handmade vegetarian pot-stickers and were able to freeze half of them for later. Well, an empty fridge signaled the need to grab them out of the freezer so I was just frying them up. (Thanks to G.M. my super cooker/baker friend for the recipe!) Yum!


 Since DH made me pose with the pesto, it is only fair that I also post a picture of him. Here he is looking handsome with Eva, attentive as always.

She was sulking a little though because she didn't get to try the pesto. No garlic for puppies! It is toxic to them!


Tuesday, June 18, 2013

Plants!

Finally, after all this "gardening" I just now get around to putting plants in the ground!

Since I didn't get the raised beds filled soon enough, my tomato plants had gotten out of control.
The raised bed is 4 feet wide, so you can see that the tomato plant is nearly 3 feet long already.
Good thing tomatoes have a trick up their sleeves... well, that is if they had sleeves... or arms for that matter.
Anyway, most plants will promptly die if you plant them too deep. If too much of their stem is buried they suffocate. But not tomatoes... they thrive! You know those little hairs they have on their stem? If planted underground, those spots will sprout roots only making the plant stronger and more stable. Magical I know! I guess some pepper plants can also be planted a little bit deeper, but don't even try it with any other type of plant. Consider yourself warned.

So here is the tomato in it's own gigantic hole. He got so long that more than 3/4 of the seedling will end up underground. Since I didn't want to dig a hole half way to China, the tomato will actually lay horizontal in the hole. You can see from the picture below that the tomato only ends up being about 4 inches tall. (It is the plant in the middle of the four silver posts.) Hopefully he will be much happier now that he has room!

The three plants on the left are cucumbers. They will grow up that trellis. Don't tell him, but I may need to thin out that middle one if all three end up surviving. Poor guy. All the other little green sprouts you see in there are baby marigolds. Hopefully they will grow up and protect the tomatoes and cucumbers from pesky bugs. Marigolds are a natural pest deterrent!

Here are the artichokes! I have never seen fully matured artichokes, but I guess they can get up to 6 feet in diameter! I don't think mine will grow that big as they are an annual in this climate. I expect they will get around 3 feet wide. That fifth one in the middle may need to be thinned if they get too big.
Aren't they cute!

Here is an update on the hops: they have officially reached the top of the poles and started their horizontal climb. They are probably about 12 feet long! You can also see garden-dog Eva. She keeps a close eye on everything while I garden, especially flying bugs and butterflies which she likes to chase.

And here she is again, below, posing by the newly transplanted Sweet William. I swear she could be a dog model. I know the Sweet William look a little scraggly. I had them crowded in a container from last summer since they are bi-annuals. (Meaning they last two years... don't ask me how that works.)


Here (below) are the garlic... if you look close you can see some curly parts. Those are the "scapes" that will turn into flowers if left alone. According to internet research, the experts are torn on whether or not cutting them off produces bigger bulbs. Evidently the scapes are pretty tasty if you saute them up! We may just have to find out...


And last but not least, here are the acorn squash. Originally I was only going to plant two, but since I left them in their tiny seed containers for too long they were kind of sad looking. So I planted four to be on the safe side in case a couple don't make it.


The only problem? We still have a good 1/4 of the pile of top soil sitting in our driveway! I'm thinking I may just have to build the asparagus bed this year so we have some place to put all that dirt! I just happen to be free this weekend.... honey?


Sunday, June 9, 2013

Rub Some Dirt in It

Rub Some Dirt in It

Well, you know I am up to something when the driveway/garage looks like this:


We finally got the dirt in for the raised beds! I am the proud new owner of two cubic yards of top soil. It is a lot more than what it sounds like.
The thing about top soil in our area is that it is very sandy. That means plants sometimes need a bit more nutrients than is readily available. This is where compost comes in... but my compost pile is still tiny. So I went and bought 26 bags of compost. That's right, 26. I think the checkout lady's eyes almost popped out of her head. Thank goodness DH (dear husband) was there to put up with my craziness, and we loaded all the bags in the trunks of our two cars. Each bag being 40lb, that is a lot of weight and we ended up driving home super slow with our flashers on. Good thing it was only 2 miles away.

One thing about the top soil and compost is that it needs to be screened or filtered. Think of a giant sieve to take out all the rocks and sticks. So here is a picture of the screen I built which just fits over the wheelbarrow. That way, as we scoop the dirt into the wheelbarrow, we can sift it through the screen and dump the pebbles and sticks.I have to admit the top soil is much sandier than I was expecting, so the good news is there weren't as many obstructions as I was expecting.

So our dirt now has the bulk (top soil), and the nutrients (compost), but now it needs the right "fluffy" structure. That is where the vermiculite comes in. You know that fluffy white stuff in potting mixes you get? Yep, that's vermiculite or perlite. They help keep the soil light and airy so it doesn't get too packed down.

Mixing all that together, add in a touch of fertilizer, lime, and epsom salts and you have some quality garden soil. About 40 wheelbarrow loads later, and we have the raised beds filled and ready for planting! Well, almost. Don't worry, Eva was there supervising our every move

Now that the raised beds are complete, I had to work on some garden tools that I need this season as well!
Here are some squash trellises I built following (mostly) these directions here.

I also bought a hose-hanger with a spigot. Before, in order to get to the faucet and turn on the hose you had to step on random plants (daylillies?) clogging up the garden bed. Now, a short hose brings the water to the edge of the garden bed where the new spigot is connected to manage the water flow. I can hang the long hose here, so I don't have to trample plants (even though they are probably mostly weeds).

I love installing things that make life just a little bit easier!

Finally! Thanks to some seriously fantastic hard work from DH, we were able to complete the raised beds, and all the plant structures. Here they are in all their glory!

This "tee-pee" structure is for the acorn squash:


This one is pretty cool... if you look closely you can see the wire arching over between the beds. This is what the cucumber will climb up (hopefully).

And here (below) are the start of the tomato trellises. You see those long silver poles in the picture to the right? As soon as I get them cut (and something else to hold down the black plastic) they will slide down over the rebar that we pounded in. I promise there will be more details once I get the tomatoes planted.


Now just to get around to actually planting the stuff!


Friday, May 31, 2013

Spring in Swing!

Spring in Swing!

So I thought I would give an update on the overall garden as a whole. As we are finally getting some warmer weather and rain, plants here are going crazy! Most of the landscaped beds are getting out of control and really need a whole re-haul, but here are some of the highlights:

When MIL (mother-in-law) came to visit last weekend, she was kind enough to bring some of her perennials that needed dividing. (Score!) I got some lillies, irises, and hostas. For a yard that was already landscaped, our new house only came with 3 hostas. I was amazed! Usually these hearty, low maintenance plants are a staple in Midwest landscaping.


I was most excited for the irises, and let me tell you why. The ones MIL brought originated from her father's garden. My mom also has some irises in her yard that I will get my hands on in August, which originate far back on my dad's side of the family. (Possibly all the way back to Germany? Mom, do you know?) So soon I will have irises from my family and DH's family that have been passed down for generations. How cool is that! Not only to have plants passed down, but they are both irises!

Here are some other highlights (surprises) from the landscaping:
Giant hydrangeas - I don't know if they will bloom or not, 
but I may need to move them eventually.

A surprise peony - I swear this appeared overnight!


 Funky succulent-like plant - don't know what these are, but they are all over the neighborhood. I plucked off last-year's dried stalks that had flowers on them.


My hops that I planted are doing well!


My tomato "seedlings" are going crazy - I really need to fill the raised beds with dirt to get these planted!


My sweet william -  I planted these from seed 2 years ago and they are finally blooming!


Then of course there are always the trouble-maker plants that seem to take over...

This strange bulb-grassy plant:


This invasive groundcover:


Shrubs that I tried to kill:


And this scraggly bush that maybe could
 be nice if I actually trimmed it:


Oh, and it looks like Eva doesn't approve of the tree stump left in her kennel... you can see the holes she has started digging around it. (That is her skeptical/guilty face).


Any idea what my mystery plants are?
 
UPDATE! I found out from my mom that my family's irises come from my Dad's Grandma's Mom... (my  Great Grandma Mayme's mom) so that makes it my Great Great Grandma. We can't confirm, but IF they went back one more generation, they would have come from Germany. Which they very well could have! Talk about a legacy!

Tuesday, May 28, 2013

The Elephant in the Garage

Sometimes there are just those projects that get away from you... come on, admit it.
Well, this was mine: the raised garden beds

I was really excited about finally having a yard, and getting to build a raised bed garden. I was so excited I went out and bought the materials... last March. Yes, that is right. I have had all the materials sitting around for over two months.The people at Lowe's were amazed I was able to fit it all in my tiny Honda Civic. (Thanks Dad for teaching me how to pack a car!)

I fit all of that material in one car load...


"Two months? That's not too long for a project to sit," you may say... But it has been taking up my parking spot in the garage. Oh yes, I have been parking outside and walking by this beautiful lumber every single day for the past two months. It was my own personal "Elephant in the Room" that I turned a blind eye to.
I used a variety of excuses: it's too cold out, I don't have enough time, I will get to it eventually, I have other gardening tasks that need to be done first, we need to deal with the sprinkler system first, etc.
So what was really keeping me from building them? Two pieces of lumber. That's right, I had all the wood but I just needed to cut up two 4"x4" posts into shorter pieces. The problem? It meant I had to use the scary circular saw...

Don't get me wrong, I have a healthy respect for very dangerous power tools. I know how to use them safely, what to do, what not to do, etc. But this isn't one of those nice table radial arm saws... this is my dad's 30+ year old, heavy, "hand held", circular saw. Oh, and the cord was frayed at one point and has been taped up. The blade is old and dull too... probably not the safest tool in the shed. This thing is a monster that you have to be really careful of.

I finally bit the bullet. I set up my sawhorses, got the heavy duty extension cord, got my safety glasses/gloves on... and made the first cut. It didn't go all the way through. The post is 4" thick and the blade only cuts down about 2". So for every one piece that I wanted to cut off, I had to make 3 passes with the "monster" saw. (Cut, quarter turn, cut, quarter turn, cut.) Needless to say, the cuts were far from perfect but they worked for what I needed.

After that was done, I was no longer "stuck" with my project and the very next day Dear Husband (DH) and I assembled the first raised bed. Thank goodness I borrowed Dad's super-duper drill, we never would have gotten through it with my wimpy battery powered one!

So here they are, in all their glory. I never would have gotten them in without the help of DH, MIL and FIL (mother-in-law and father-in-law) who came to visit over the long weekend. Thanks guys!

The black stuff is a plastic weed barrier as I am trying to kill the grass and eventually install pavers around the beds. That way it won't get muddy and DH can mow more easily.

The next step was to put cardboard inside, once again to kill the grass. This will eventually decompose so the roots can reach down farther if they need to.
Then I put down some chicken wire since we have little bunnies who will probably like to burrow under the beds. I stapled the wire down to the first bed but half-way through the second bed, my brand new staple gun jammed... bad. I had to take it apart to clear the jam, but I couldn't assemble it back together correctly. I spent at least a few hours trying to, and I found where all the parts went, but it still wouldn't work. Finally I gave up and will have to buy another one to finish the job. Grrrr. One of the things I hate the most is a broken tool so you can't finish a job.

Next up is trying to fill these giant beds with some good dirt! But that will have to be for another post... stay tuned!