Friday, August 25, 2017

Fireplace Facelift

You may remember our *lovely* shiny, brass, dated fireplace from when I installed the gas starter last year.

Dear Husband (DH) said it reminded him of a marching band instrument.
As our 90's house came with all shiny brass finishings, we have slowly been replacing light fixtures, cabinet handles, and door handles to lessen the outdated glare.

Well I am finally getting around to updating the gleaming fireplace.
The first step was cleaning and sanding. Since the metal had a high shine, the paint wouldn't have stuck to it.


If you look past the cobwebs, you might be able to see that to the right of the handles is a little less reflective. That side I have gone over with some steel wool to "rough up" the surface a bit.

I should have used a coarser wool, but all I had on hand was super fine. I'm hoping the paint won't scratch off too easily.

After a thorough sanding, vacuuming, and wiping, it was ready to paint... almost.

The paint I used was a spray paint used specially for high-heat situations (grills, fireplace exhaust pipes, etc.) This is key because while I wasn't painting the inside, the outside can still get pretty hot. It only comes in a matte black color, but that is so much better than glaring gold.

Since I was spray painting, and I couldn't exactly take it outside, I had to spend a few hours taping off the tile, walls, and surrounding areas. This is one of the most boring, but important steps. It's tedious, but it makes the difference between a great paint job, and a crummy one. (I used saran wrap on the glass which worked better than I expected.)


Spray paining inside gives little ventilation in an enclosed space, and the fumes will be bad. It was so hot out, I tried to avoid opening the windows but in the end we had to.
Turns out it was actually an advantage because the paint dried so quickly in the heat, I was able to do a touch-up coat of paint less than an hour later.

Thankfully, before I actually started painting, I did put a respirator mask on. (I should have gotten a picture of that!) The house still smelled of spray paint for a couple days though.

Removing the tape is the fun part. You really get an idea of the finished product with pristine lines as you peel back the coverings.

After all was said and done, the finished product looked exponentially better. No more eye-sore glare!

Hopefully it won't scratch too badly, but I could always touch it up again.


Sunday, July 30, 2017

Newest Addition

It has been a while since the last post, but I have a pretty good excuse... I have been EXHAUSTED!


Eva is getting a new sibling!


Thursday, March 30, 2017

Week 6 and 7... and 8: Entryway

Ok, so the entryway took 3 weeks... or 4, but in all fairness Mom and I used one of the weekends to paint. So that doesn't count, right?

Following along the path (but not timing) of the 14 Week Home Organizing Challenge, I have been working on the "Launch Pad" or for me, the entryway.

There wasn't much to do here, but honestly I have been running a bit out of steam. The rest of the house and life can only be ignored for so long until it gets cluttered, and I needed to straighten some of that out. So yes, arguably the easiest part of the house took me three weeks instead of one. Sometimes that is just how life goes.

I started with dusting from the top down. Then I wiped down all the wood with Murphy's Oil Soap and vacuumed the stairs to prep for painting.

The old peachy color on the railing spindles and stair stringers went with the old paint scheme, but since we had the interior painted it just looked like an eyesore. I ended up going with the color Eider White (from Sherwin Williams) and using an enamel latex paint. That should help with the durability and helped reduce paint strokes. A lesson learned was to apply thin coats of paint to avoid having drips running down the spindles.

Thanks to Mom and her amazing trim-taping skills, this went easier than I expected. We still had to sand, wipe, tape, trim, and paint so it took a solid two days to complete. Two coats of paint might have been passable, but I'm so glad we did a third coat as long as we had everything taped off.

Eva was quality assurance as always... and only got paint dripped on her once.

By the way, if you ever have to paint walls or trim right up to the carpet, this trick worked like a charm: put PACKING TAPE along the edge of the carpet and let the edge run up onto the baseboard by about 1/2" to 1/4". Using a plastic putty knife (or some sturdy tool), push the top edge of the tape down, pulling the carpet away from the baseboard. If you are lucky you might be able to get the tape all the way under the baseboard.
In our example you can see it pulling the carpet away from the stair rungs.


The tight space makes it really difficult to photograph, so the pictures don't do it justice. The new color really makes such a difference.

 As you can see, Eva was being very helpful with the pictures...
Here it is painted, but before you take the tape off.


Then you peel away the tape, and it is like magic! It has to be one of my favorite parts of painting.


I really can't thank Mom enough. Not only does she lend a helping hand to make things go faster, she helps make it fun. I wouldn't get half the projects done if it wasn't for her hands-on and emotional support. Love you Mom!


Here's to a clean, painted entryway!


Oh, and I told Dear Husband (DH) that I was having a tough week and would like some flowers from him. He was super sweet, went above and beyond, making me a surprise dinner and got me an orchid! I've never had an orchid before. (I was just expecting a bouquet of daisies or carnations.)


Wednesday, March 8, 2017

From Shocking, To Soothing

No, your eyes are not deceiving you... this is a bright pink and yellow room.
(We actually finished this project before the holidays but I didn't have time to post about it.)
While I am sure many seven year old girls would be jealous, we are using this room as a second guest room and it doesn't exactly scream "calm." 
Don't get me wrong... it's certainly screaming something, just not anything soothing.

I was already in the middle of the process when I remembered to take pictures... oops. Blog fail.

The closet still had the original builder grade paint on the inside and was pretty scuffed, so I used leftover light gray paint from the dining room to refresh it.

You could tell this room was used and loved by a small kid because the walls were all kinds of dinged up.

I got to do a LOT of patching and sanding.

The paint color I used was Sherwin Williams - Sea Salt.
It is a cool gray with hints of green and blue. Very subtle.

Some people might consider it boring, but I think this room needed a calming break after all the... uh, energy... it had before.

Here is the before, and the after.
Sometimes it amazes me the difference just a couple coats of paint make.
Oh, and you can see the new curtains I hung, and a sneak peek of the new headboard. Another post on that in the future.

Sunday, February 26, 2017

Week 4 and 5: Formal Living and Dining Rooms

So I'm working on the 14 Week Home Organizational Challenge. since I am taking extra time for some of the tasks, weeks four and five for me were supposed to be working on the Dining Room and Formal Living room. 

Well, that kind of happened... 
Week four I did nothing. I needed a break, and we were still recovering from the Super Bowl party, which was awesome by the way.

We had 16 adults, 3 kids, and 3 dogs. It was a fun, packed house! 


Then week five came around and I started clearing the formal living room. Except it is mostly empty already. This was the room that we spend forever in trying to remove the wallpaper paste. The only thing in there was the piano and a couple shelves I had just bought. 

Once you have gotten off the wagon, you feel like you will never catch up again. Part of me was dragging my feet because I didn't think I could finish. I just wanted to let it trail off into oblivion. We have all been there. I should have been able to get the space done in a couple days, but instead it took the whole week. 

I dusted, I spot cleaned the walls, I washed then stained then waxed all the wood trim and windows. I vacuumed, OH! Our new vacuum!


You may remember out last one bit the dust (lol no pun intended) when we were trying to finish the nook. Thanks to my mom, I hate sub-par vacuums. She still has her 30+ year old vacuum, and they just don't make them like they used to. The one we got cost an arm and a leg, but hopefully it will last half as long Mom's. 


After the carpets were finally vacuumed well, I tried out the carpet cleaning machine we bought forever ago. It did seem to work really well and got a lot of dirt and sand out, but it didn't do as well on the older stains as I was hoping. 

Of course all the "stuff" moved over into the just-cleaned living room so I could start the dining room. Sigh.

 I literally did 90% of the dining room in one day. 

Eventually we will get a table for the dining room so you can actually dine in there (imagine that!), but the big accomplishment this time was finally getting the wedding dishes out of the basement and into the buffet. 


Yes, we have been married five years and the dishes were still packed in the basement. I can't be the only one, right?


There are still a couple things to pick up (cleverly hidden by camera angles), but these two rooms are now most of the way there!


Mom is also participating in the challenge, and she is making great progress too! Check out her dining room:

Tuesday, January 31, 2017

Week 3: Pantry and Kitchen Nook

Week two of the 14 Week Home Organizational Challenge was the pantry.

Of course I am taking it slower and using two weeks for some of the rooms, so I did the pantry in week three.

The "before" pantry wasn't terrible, but can always use a good clearing out. 

First, we pulled everything out. Since I just cleared this out last year, there weren't too many expired items, but still some we had to toss. 

Then we wiped everything down, including the baseboards and floor. It seems as if this pantry collects dust bunnies as they scurry across the tile floor and get sucked under the door. 

After everything is culled and cleaned, you can sort the food into categories and replace back on the shelves. 


Our "after" doesn't look terribly different. It was a lot emptier, but then we went to Costco. And yes, those are chocolate covered potato chips from Costco that you see. Dear Husband (DH) snuck those into the cart when I wasn't looking. Can't say I'm complaining. 


The other area I looped in to the pantry was the kitchen nook. The kitchen was a big enough task in itself so I put the two smaller tasks together.
Here is what it was before, cluttered with all our kitchen cleaning bins.
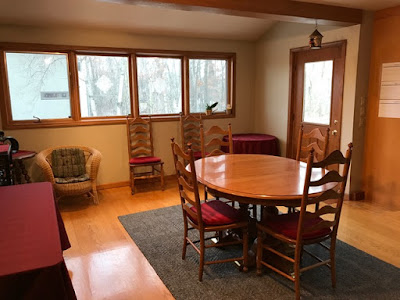
It started with dusting things like ceiling corners and the ceiling fan (thanks to DH for tackling that one!) Then washing the windows, window frames, table, chairs, and baseboards. I also spot checked the walls for any scuffs that needed a magic eraser. Then to wax all the wood trim.

I had gotten down to cleaning the floor, and this is where I got stuck:


Yep, the vacuum cleaner decided to go on the fritz. Six days before we had 20+ people over for a Super Bowl party. Awesome.

So here is where the nook stands for now. All clean except for the floor. Somehow I doubt the vacuum can get fixed in less than 5 days. DH, bless his heart, was already having a crummy day and still tried to take it apart and fix it for me. Be still, my heart.


Due to preparing for the Super Bowl party, we took a week off of the deep-cleaning so we could get everything else "good enough" for guests.

Sunday, January 22, 2017

Week 2: Kitchen Finished!

How often can you really say that your kitchen glistens? For a brief period of time, mine did!

Following the 14 Week Home Organization Challenge (Kitchen Week), everything has been cleaned. For some reason they think you can deep clean your kitchen in a week, which is nonsense. Last year it was my first time doing this and it took me four weeks! I am giving myself a break and allowing two weeks for the big tasks... like the kitchen.

It all started with the cabinets: they were emptied, vacuumed, wiped, waxed, "stuff" culled, and then re-stocked. That alone took a solid week for 40 cabinets!

To the left you can see my "cooking station" so I have everything in reach when cooking/baking.

To the right is just a lot of miscellany. I have a little bit of room here where I might move some of my homemade canned goods to.

I still have one cabinet that is too full, but it has the small appliances we need but don't use terribly often.

Next was backsplash, counters, sink, small appliances (microwave, stand mixer, etc.), stove, dishwasher (make sure you clean the filters!), fridge/freezer (inside and out), baseboards, and floors.
I found it helpful to work in a "top-down" approach, that I learned from my mom. (Thanks Mom!)

See that glass paned cupboard on the right? That contains teacups from previous generations of women in my family.

The top one is from my paternal Great Grandma circa 1910's? The middle is from my paternal Grandma's collection, and the bottom from my maternal Nana's collection. I have space for three more on the other side of the sink and I am hoping to have Mom and MIL each pick out a set that "represent" them, to add to my collection.

In case you are wondering, here are some of my favorite cleaning products that I use:


Don't be too envious of the kitchen... this week I am to tackle the pantry and kitchen nook. Yeesh.


But first, what's needed after two tough weeks of cleaning the kitchen? Puppy snuggles! I love how much she loves her dad.


You may remember that Mom is also doing the challenge with me!! This is her first time doing it, so everything is going to take a lot longer. Perseverance is tough, but needed. Go Mom and Dad!

Here are some of the results of their hard work. Looking good!