Tuesday, December 17, 2013

Closet Case (Part 2)

Part two of the Master Closet Renovation! (If you missed part one, you can find it here.)
- Popcorn ceiling is removed? Check!  (Thank goodness!)
- Walls and ceiling spackled? Check!
- Walls and ceiling cleaned? Check!

Next steps:
- Tape off baseboards and trim
- Cover floor with drop-cloths and plastic
- Prime! Finally!

Here is Dear Husband (DH) doing a fantastic job with the trim work. Since we are priming both the ceiling and walls, we didn't need to tape off the ceiling.
Buying quality paint and tools may be more expensive up front, but in the end it saves time, money, hassle, and gives you a much better result. Worth it! I use Sherwin Williams paints, but only buy it when they are having a 30-40% off sale. At that price it is the best paint you can buy, at a comparable price.

Because the sales are so short (2 or 3 days) and you don't get much head's up... the key is to have everything planned. If I'm not currently painting a room, I plan which room is next, what the color will be, and how much paint I will need. Then I can just pop in and pick it all up. The only problem is your paint might sit around for a while before it is used. I think our closet paint was idle for a month and a half or so. Just stir before use, and it is as good as new.

As long as we were priming the closet, we also took care of the "surprise" left by the previous owners...
When we toured the house, inside the garage they had large free-standing office shelves up against the wall. The realtor noted that these would not be sold, and would be moved out once the house sold. No big deal, no problem.
Before we signed the papers, the realtor did a walk-through to make sure nothing was damaged or removed. She left a voice-mail saying that everything looked good, except the previous owners had left us a surprise in the garage.
After signing the papers and getting the keys, we headed over to our new house. Sure enough, the shelves inside the garage were gone, but on the wall behind where they had been, was this: an old children's "painting".


I just started cracking up! I was annoyed, but because it was in the garage I didn't think it was that big of a deal. DH was a little more peeved, but because I didn't care that much he let it go. For a whole year, every time I went out the garage, the ugly purple smiley face laughed at me.

But no more! After quite a bit of sanding and a quick wash, I used the rest of the primer in the tray to cover it up. Being in the garage, it was pretty cold and the paint started to get really thick. It was like trying to roll glue on the wall! It probably took a whole week to dry, but now we don't have to be taunted by the purple smiley face. Whew!


Monday, December 9, 2013

Christmas Present from Eva

Please note: NOT for the faint of heart! If you are at all squeamish, STOP reading now!
Don't say I didn't warn you.

Darling Eva went out into her kennel for her last potty break of the night. She was out there for a really long time and since it is now cold out, Dear Husband (DH) and I were starting to wonder.
Finally we heard her coming back in, but then I heard DH scream "Oh my god!" (in a manly way of course.)
I run around the couch to see what's going on... and there she is. Eva has a dead wild rabbit in her mouth and she is so very, VERY proud of herself and what she has brought to us.

So what happened? We have seen rabbits around since we moved in. Eva has given chase to a few and we have seen her track them through the grass (and eating their poo), but she has never been close to actually catching one. We never encouraged this behavior, but we didn't discourage it either as it is instinct. Except the poo part... we try to keep her from eating that. Ick.

That night though, Eva didn't have access to the whole yard, just her 20'x10' kennel which she can use at any time. So the rabbit must have been daft enough to squeeze into Eva's kennel, which undoubtedly smelled of dog, in search of some munchies. The rabbit kind of had it coming if you ask me.

Well Eva must have popped out of the doggie door at just the right moment, finding the bunny exposed and trapped in her kennel. She probably ran it around and grabbed it as it was trying to squeeze out the gap by the kennel door. For my own sanity, I am choosing to belive that the rabbit had a quck and relatively painless death. As far as we know, Eva didn't puncture the rabbit as there was no blood anywhere. So I'm thinking that she got the rabbit's back or neck and shook, so it snapped quickly. Poor guy.

The useless death of any animal is never ever a good thing. I would never train/encourage a dog to attack or kill anything. This was pure canine instinct. Eva is part terrier (Schnauzer, we think) and their true bred purpose was to chase and kill rats and other vermin. Her mom is a Maltipoo (Malteese + Poodle), and believe it or not Poodles were originally bred for retrieving water fowl and other animals that had been shot by the dog's owner.

That being said, part of me (probably the sick and twisted part) is actually very proud of Eva. She is taking after her ancestors, showing her true purpose as a bred canine. She chased the prey down, quickly and efficiently took it out, and brought it to us without ruining the meat. What amazes me the most is that she brought it to us. Instead of playing with it or chewing on it, she pulled it through a doggie door (that she has to jump through), up a ramp, then though another doggie door in order to get the rabbit to us. She really loves us and was proud to show and share her trophy. Part of me realizes how blessed we would be to have Eva if we were starving, and relied on that kind of meat to survive.
While we did have stew that night, it was beef stew and the rabbit was destined for the trash. I didn't gag, but my stomach roiled as I picked the rabbit up with a double-gloved hand and put it in a trash bag. After it was disposed of, Eva would sniff the carpet where the rabbit was, and run over to me wondering what I had done with it. Confused, she continued to search.  While I know I did the right thing and am a responsible dog owner for throwing it out (avoiding sickness, disease, and bone ingestion injury), I felt really bad as a dog-mom for taking away her prize that she so proudly provided for the pack.
But I was still grossed out. I brushed her teeth twice (with doggie toothpaste), and refused to let her give me any goodnight kisses. I still couldn't stand to get any puppy kisses this morning. Maybe I will give her a bath tonight.

I look at her a little differently now knowing that we have a killer in the house, but my heart also swells knowing how much she loves us.


Sunday, December 8, 2013

Christmas Cookiedough Concocting

You've heard of Christmas Cookie Exchanges, right?
This is a spin off of that.

Instead of bringing finished cookies, you get a couple friends together and make the cookie dough to freeze!
Each person brings a favorite Christmas Cookie recipe (that you can freeze the dough), and enough ingredients to make 3-4 batches. That way every family walks away with 3-4 different types of cookie dough to use/share throughout the season!

I have never actually done this before, so this year I provided some of the staples: salt, baking soda, baking powder, vanilla, etc.
They bring their own: sugar, flour, butter, eggs, chocolate, etc.

So here's the recipe I made, a "secret" family recipe from my Great-Grandma (I think):

Grandma Songer's Cutout Cookies
Makes 3 ½ dozen, preheat oven to 350
Step I: Sift together and set aside
3 cups flour
1 teaspoon baking powder
½ teaspoon salt
Step II: Cream Well
1 cup butter
¾ cup sugar
stir in one unbeaten egg
2 tablespoons milk
Step III: Combine dry and wet ingredients, 1/3 at a time
Chill until firm (couple hours)
Roll out ¼ inch thick, cut out desired shape
Bake at 350 for 12-14 mins.(Cookies should be still slightly soft in the middle, and very lightly browned on some of the edges)

One of the other ladies found this recipe (their photo):
http://rk.wsimgs.com/wsimgs/rk/images/dp/recipe/201338/0027/img36l.jpgChocolate Crinkle Cookies
Makes 2 dozen, preheat oven to 350
Step I:  Sift together and set aside
1 2/3  cups all-purpose flour
1/2 cup unsweetened cocoa powder
1 1/2 teaspoons baking powder
1/4 teaspoon salt 
Step II:Set aside in a separate bowl
1/2 cup confectioners' sugar
Step III: Cream well
8 tablespoons (1 stick) unsalted butter, at room
  temperature

1 1/4 cups sugar
2 eggs
1/2 teaspoon vanilla extract 
Step IV: Combine 
Combine dry and wet ingredients slowly until just combined
Roll the dough into walnut sized balls using your hands, then roll the ball in the confectioners' sugar until covered. Place the balls on a prepared baking sheet 2 inches apart.
Bake at 350 for 10-12 mins, should be crackled and puffed. (These are SUPER good!)

And the last cookie? Found here!
White Chocolate and Cranberry Cookies
Makes 2 dozen, preheat oven to 375
Step I: Sift together and set aside
1 1/2 cups all-purpose flour
1/2 teaspoon baking soda
Step II: Cream well 
1/2 cup butter, softened
1/2 cup packed brown sugar
1/2 cup white sugar
1 egg
1 tablespoon brandy
Step III: Combine
Combine dry and wet ingredients slowly until just combined, add
3/4 cup white chocolate chips
1 cup dried cranberries 
Bake at 375 for 8-10 minutes

With cookies that you normally scoop into balls, it is easiest to freeze them that way. Form the balls and place in one layer on a cookie sheet. Carefully make enough room in the freezer to set the tray relatively flat. After 20-30 min, they should be frozen enough to put in a labeled ziploc baggie. That way when you are in the mood for just a cookie or two (cooked or raw) you don't have to freeze the whole batch!

A few glasses of wine later, and each of us had a freezer stocked with cookie dough for the holidays!


Tuesday, December 3, 2013

Less than $3 wreath

I was wandering through a big chain-store the other day looking for a wreath for the front door. I was appalled at the crummy fake "wreathes" they wanted $20 for. No thank you.
So instead I wandered over to the hardware department and picked up some very small gauge wire. I would have preferred green instead of silver, but oh well. For less than $3, I will take it!

Everything else for the wreath I already had at home. A wire hanger, some pliers, and plant clippers. My clippers were all the way out in the shed... so far away... so I cheated and used a pair of utility scissors which made things a little more difficult. The picture shows a hammer too but I didn't end up needing that. Instead I should have had gloves since the wires and branches are very pokey.

Gather your greens! We have a few boxwood bushes in the front of our house that donated the greenery for our wreath. You could also use pine trees if you have one of those in your yard. If you are really desperate I'm sure a neighbor would be willing to oblige a trim off of their bush. Make sure to ask first of course, and maybe make them a small wreath as a thank you! Trim a little bit here and there all around the bush, as you don't want to leave a big bare spot. You really only need pieces that are 3-4 inches long.
I only used a third of the greens shown because I didn't know how much I would need, but it was nice to have a variety of shapes and sizes to pick from. It also depends on how bushy you want your wreath to be.

Let's start with the base. Using your pliers, wrangle the hanger into the shape you want your wreath to be. I cannot stress enough: it doesn't have to be perfect... it will never be perfect! The fluffy greenery will hide all the wobbles. (I tried to make a "B" if you can't tell.)

Once you have your form, start laying a piece or two of your greenery on top. Once you are starting to like the look, wrap the wire around the hanger and branch. Try to nestle the wire down into the greenery so it doesn't show as much.
At first the branch will want to swivel around the hanger (now wreath form), but just try to keep it on top as you add more greenery.  Here is what the back starts to look like. (See right)

I found it easiest to work with sections of wire about a foot and a half long. You can always add more greenery to a section, if part of your wreath is looking a little sparse. I have about 2 or 3 pieces of greenery layered and tucked under each other to give it the fullness I wanted. Keep adding and wrapping until you make it all the way around your wreath form. Ta-Da!

I scrounged around the house and found a couple bits of ribbon to hang the wreath with but you can simply hang it as-is or add anything else you have around. If you have a bush with red berries those could be cute... or even some fresh cranberries strung with the wire!
Here it is, up on the front door. It will only last one season, but the green should stay for a couple months.


Tuesday, November 26, 2013

Closet Case (Part 1)

Closet space... something you always need more of.
When we moved into our house, all the closets had those white wire shelves that are handy, but not attractive or the most versatile.

After doing our homework, we decided on a built-in closet system from Easy Closets. They are on-par as far as price range goes (which is still really $$$) but the simplicity of designing and ordering the system online was pretty slick. You can even get your design reviewed online to make sure everything fits and is spaced correctly.I don't know what I was expecting, but I was stunned when the postman showed up with 24 giant, heavy boxes of closet kits!

I can't yet comment on the quality or ease of assembly yet, but that will come in another post.


First, we had to take out the old shelving. Here is a picture of DH (Dear Husband) working on removing those stupid wire shelves.


Then we had to fill the bajillion holes left behind. Ok, maybe not a bajillion, but DH counted at least 96. The biggest one (see right) actually needed a patch because so much of the drywall had crumbled around the hole.


 I used this patch here, (see right) and let me tell you: I was not impressed. It is a circle of drywall attached to a larger circle of paper. You cut out your wall to fit the drywall circle, insert, and spackle. I think I must have used 6 or 7 coats of spackle to finally get it smooth enough for my "discerning" eye.

 While it did end up working, it was much more hassle than our silver-dollar-size hole warranted. I should have used this one instead (see left) which is a metal plate with mesh over it and it sticks to the wall. Then you spackle around that too. Easier yes, but you wouldn't be able to put a nail/screw in it like the other patch.


Result: If your hole is baseball size or larger, OR if you want to hang something in that location later, then use the drywall plug. If it's a smaller hole and out of the way, use the metal plate sticker.

DH was more than sick of the spackle-sand cycle, but we were just getting started. After the walls were smooth, it was time to work on the ceiling. If you have forgotten how much I detest abhor popcorn ceilings, here's how I removed it last time. We followed the same process here.
It kind of looks like a crime scene with all the plastic taped up to the walls. That thing hanging from the ceiling is just the wires from the light taped off. We didn't really want to get those wet. ;)

After wetting, and scraping the ceiling, we were back to spackling and sanding. So many holes to sand kicked up a lot of drywall dust, so we could only do a little at a time.

After a quick wall washing, we are finally ready to tape, prime, then paint!


Friday, November 22, 2013

Thrift Find

I was toodeling around the "antique" store with MD (sis-in-law) the other day, and this was one of my finds:
A basic wooden box/tray.

Now I am always on the lookout for thing that can help me organize my junk stuff. I loved the shape of it, but the finish didn't exactly match our decor (or at least the direction we are trying to go).
As long as I was painting a couple other pieces of furniture, (see right) I figured I would paint the tray to match.

Step 1: Clean!
I used a TSP cleaner to get rid of any dirt and oils that may have been on there for who knows how long. This is the same type of cleaner you use on your walls before painting.

Step 2: Sand!
Ok, so I cheated on this step and only did a tiny bit of sanding to "rough up" the surface since I knew I was using a heavy duty primer.

Step 3: Prime!
This is my first time using this primer, but I think I like it. It is pretty thick, but leaves a solid surface for your paint to grip onto. The key here is that it says "bond coat" on the label. Two coats gives a solid, non-streaky base. (The picture below is after just one coat.)


Step 4: Paint!
I was using this same paint on a couple other piece, so I stuck with this Black Satin Enamel paint. I am going for that rich "Pottery Barn" black finish.

Step 5: Wait!
Since this will be pretty heavily used, holding our plethora of remote controls, I have to be patient and let the paint "cure" (fully harden) before using it. 14 days, oh the agony!

Step 6: Display!
Finally it can be put to use, and all of our remotes have a home that isn't between couch cushions.


Here is the end table that I used the same process for. I think it turned out pretty well!

 Before: (with some "roughing up")

After: sleek and smooth!


Wednesday, November 13, 2013

First Snow

Last weekend, before the snow hit, I was able to spray paint a couple coats on my latest thrift find: a mirrored tray.
I picked this up at a local antique/thrift shop for a whopping $4. A design trick is to place things together on a tray to make them look more cohesive, like they belong together. It is tough to tell but it started out a very pale gold,which does not fit my color scheme.
I scrubbed it quick to get any thrift shop ickyness off of it. After it dried, I sprayed it with a couple coats of grey primer.


Then I used a "brushed nickel" spray paint to give it the right finish. I like the way it turned out, even though it isn't quite as "lustrous" as I would have hoped.
Now it will hold all the guest bathroom fru-fru's


Well we just got our first snow of the season. You would think it would be a nice little dusting, but no... not up here with the lake effect.
According to the tape measure, the snow on the deck was 11" and that was after it melted a bit. Official forecast said 13".


 Eva was born last year so she is used to the snow and charges in like a champ. Too bad this first snowfall is higher than her chest, so had to try and bound across the yard.


  Of course this is the perfect snow, where it is light and fluffy but packs together perfectly for snowballs. This left Eva's fur packed with little snowballs and started bogging her down after fifteen minutes. She was also starting to get cold so it was time to come in... and next time we will try the doggie booties to keep her paws warm.


Wednesday, November 6, 2013

A Corner for Compost

I really didn't think I was going to get the compost bins built this season, so I was being a little optimistic when I bought the material.
But thanks to my sister, SisX, we got it knocked out in one weekend!

As usual, I have materials for various projects sitting around the house. So when SisX came over this past weekend, she had her choice of activities to help with. One option was sitting on the couch watching a chick-flick, but we decided to be a bit more active.

She picked: Building the compost bin! ... but then we had to wait for the drill to charge, so we blanched and froze tomatoes for a bit...

An hour later... back to the bins!

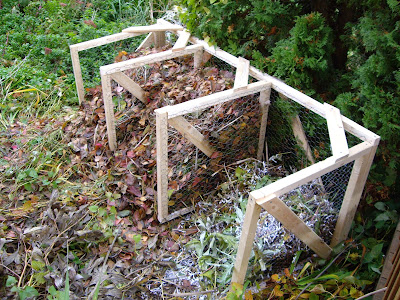
Here is the general idea. But of course I didn't need mine to be so fancy shmancy. All I was looking to do was have three separate piles for compost.
Why three?
The first one is your "adding pile." It's where you put all your fresh scraps, plants and leaves. It's the only one you are adding fresh material to.
The second pile is the "cooking pile." It is doing it's own thing, working hard to break down all those scraps into garden gold (compost).
The third is your "finished pile." It is for fully composted material that you can use as needed.

So when your adding pile gets full, your finished pile will be empty (because you used all that glorious compost), and your cooking pile will be decomposed and ready to use... your piles naturally cycle themselves.

The nice thing about a compost bin is that it doesn't have to be perfect. There are probably no right-angles, the walls are a different height than the back, it will rot away in a few years (untreated pine instead of cedar), and all that is ok.

We started by making four squares with a diagonal support for rigidity. Then SisX cut and stapled chicken wire to them. (Thank goodness because I kind of hate working with chicken wire!)

We did the same thing for a longer back panel, then put it all together! Not an exact science, and hardly any exact measurements. Perfect!

So here it is placed in the garden. You want a site that has a bit of shade so it doesn't dry out, close to a hose or water source, not too close to the house because of bugs and critters. I also strategically placed it withing "throwing distance" of the deck so I don't have to wander out too far.
The far two slots just got filled with fall leaves and grass clippings. They can start breaking down over winter!


I'm thinking it needs a name. I feel like it's a "she," but the real question is what do you name a compost bin? Compy? Binita?
Do you have any suggestions?


Saturday, November 2, 2013

Puppy Party

Well this was the week. Our little baby turned one year old!

Of course we had to celebrate with a party, so we invited her "boyfriend," Aiden, over along with his dad, JP. We had treats for the kiddos and the adults.
The dogs got "pupcakes" from this recipe here. The great thing about this was that I already had all the supplies in my kitchen!

Doggie Birthday Treats
1 egg
1/4 cup peanut butter
1/4 cup canola oil
1 tsp vanilla 
1 cup shredded carrots
1 cup wheat or white flour
1 tsp baking soda
1/3 cup honey (optional)

Directions

  1. Preheat oven to 350 degrees F (175 degrees C).
  2. Combine the egg, peanut butter, oil, vanilla, and honey, if desired, in a large bowl; blend well. Stir in the carrots and mix thoroughly. Sift together the flour and baking soda and fold into the carrot mixture. Spoon cake batter into prepared pan or cookie sheet.
  3. Bake in preheated oven for 40 minutes. Let cake cool in pan for 10 minutes; then turn out onto a wire rack to cool completely
And let me tell you, the puppies went crazy for them. I frosted them with plain peanut butter which ended up being quite messy, but the dogs were more than willing to oblige and clean the tile floor spotless!

The people got a homemade cookie cake. I used this recipe which turned out fantastic. I had never made a cookie cake due to the fear of a raw center, but this ended up being perfect... except that it was much bigger than expected!


Giant Chocolate-Chip Cookie Cake

1 cup butter, softened
3/4 cup white sugar
3/4 cup packed brown sugar
1 teaspoon vanilla extract
2 eggs
2 1/4 cups all-purpose flour
1 teaspoon salt
1 teaspoon baking soda
3 cups semisweet chocolate chips
(You can omit one cup of the chocolate chips and add a cup of chopped nuts)

In large bowl, beat butter, granulated sugar, brown sugar, and vanilla until light and fluffy. Add eggs, one at a time, beating well.
Gradually add flour, salt, and baking soda, beating until well blended. Stir in chocolate chips (and nuts if desired).
Line a 14 inch round pizza pan with parchment paper. Spread dough, evenly, over the parchment paper. Bake at 375° for 17 minutes. Cool cookie in pan on a cooling rack. Decorate as desired.

Aiden (ok, maybe JP) got Eva a giant smoked bone for a birthday present. She LOVES it, but I only give it to her for a short amount of time so she won't eat it all and get sick.

Dear Husband (DH) got her a stuffed skunk. In under 5 min flat, she had found the squeaker and extracted it through the side of the toy. Now the skunk has had a nip-tuck. Eva nipped, I tucked!... then she nipped again. 


 We gave out Moose Antler Slices as a puppy-favors. Both dogs loved them.  *Please note that antlers are shed naturally every year, so buying from a reputable dealer does not contribute to any poaching.*
I had gotten an elk antler for her and it has lasted a few months. It was a "tine" (the tip part of an antler which is tougher). The moose ones I got are "slices" of the flat part of an antler, which are more porous. The only problem is, with Eva being the power-chewer that she is, she worked her way through the antler slice pretty quick. This is the picture just 20 min after we gave it to her. Two days later... it is too small and I have to take it away. Don't worry, I bought multiple.


Aww my little birthday princess!