When we moved into our house, all the closets had those white wire shelves that are handy, but not attractive or the most versatile.


I can't yet comment on the quality or ease of assembly yet, but that will come in another post.
First, we had to take out the old shelving. Here is a picture of DH (Dear Husband) working on removing those stupid wire shelves.

 Then we had to fill the bajillion holes left behind. Ok, maybe not a bajillion, but DH counted at least 96. The biggest one (see right) actually needed a patch because so much of the drywall had crumbled around the hole.
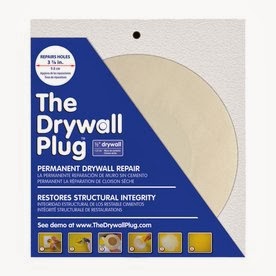
I used this patch here, (see right) and let me tell you: I was not impressed. It is a circle of drywall attached to a larger circle of paper. You cut out your wall to fit the drywall circle, insert, and spackle. I think I must have used 6 or 7 coats of spackle to finally get it smooth enough for my "discerning" eye.

While it did end up working, it was much more hassle than our silver-dollar-size hole warranted. I should have used this one instead (see left) which is a metal plate with mesh over it and it sticks to the wall. Then you spackle around that too. Easier yes, but you wouldn't be able to put a nail/screw in it like the other patch.
Result: If your hole is baseball size or larger, OR if you want to hang something in that location later, then use the drywall plug. If it's a smaller hole and out of the way, use the metal plate sticker.
 DH was more than sick of the spackle-sand cycle, but we were just getting started. After the walls were smooth, it was time to work on the ceiling. If you have forgotten how much I
 It kind of looks like a crime scene with all the plastic taped up to the walls. That thing hanging from the ceiling is just the wires from the light taped off. We didn't really want to get those wet. ;)
 After wetting, and scraping the ceiling, we were back to spackling and sanding. So many holes to sand kicked up a lot of drywall dust, so we could only do a little at a time.
After a quick wall washing, we are finally ready to tape, prime, then paint!
Can't wait to see how it all turns out :)
ReplyDelete