Sunday, April 21, 2013

Mudroom: The Reveal!


So the moment you have all been waiting for... ok, the moment I have been waiting for. Dear Husband (DH) and I have finally finished decorating our first room, even if it is just a closet.

It wasn't without it's hitches though. After all the painting was complete, it came time to install all the pieces we bought for it. We have a shelf/rack, a bench, and some wall organizers. (You may remember the organizers from a previous post.) I had already assembled the bench and coat rack, and just needed to install them.

The bench fit perfectly, no problem. The shelf was a different story. When I bought the shelf online, I looked at the finished dimensions and knew it would be one inch too long for the closet. No problem... looking at the design, the top piece extended out and I could cut 3/4 of an inch off either side to give me 1/4 inch of wiggle room on either side to install it. (Think about that one for a second.) So before I assembled it, I measured twice and cut. I even took that longer piece that I had cut into the closet and made sure it fit. Check.

But.... I didn't take into account the door frame. *Head smack* While all the parts fit easily in the closet, the door frame is narrower. When the shelf was fully assembled, it was too tall to insert vertically then turn horizontally to install. The diagonal length of the shelf was longer than the closet is wide.

I had a "boat in the basement" problem. Crud. Except I actually wanted this particular boat (the shelf) to end up in the basement (the closet.) Needless to say I ended up taking apart the shelf, putting all the pieces in the closet, then re-assembled the whole thing inside the closet. Did I mention that this shelf is HEAVY? I had two screws left over because I didn't have the physical room to screw them into the sides of the shelf. (So I supplemented with a couple of tiny "L" brackets.)


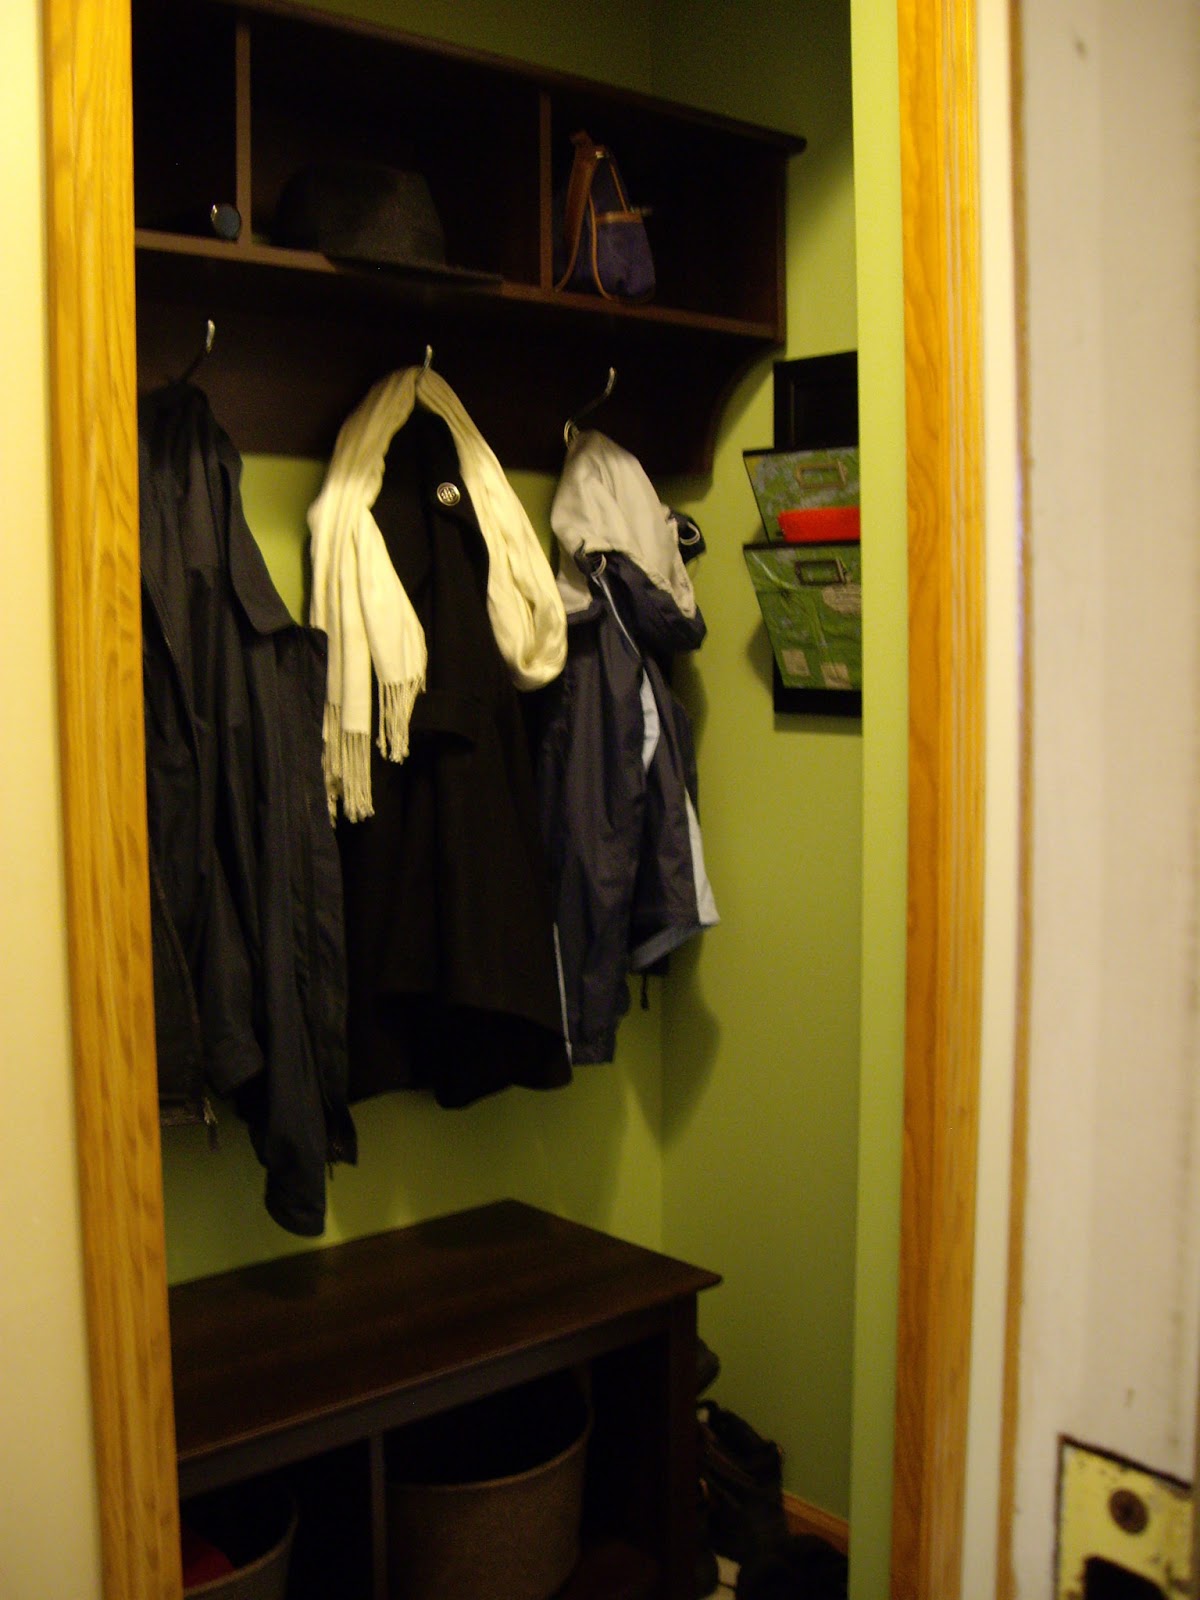
Anyway, in the end I finally got it all together and we LOVE the way it looks. Finally the first room that is fully organized and decorated in our style! (And even with a flat ceiling!)

Wednesday, April 17, 2013

"Gardening"

Let me share a secret with you...*nervously looking around*  I don't actually know how to garden. Gasp! Now those of you who know me might beg to differ, but it's true; I don't really know anything.
In my mind real gardeners just know. They know when to plant, what to plant, how to plant it, how to take care of it, and exactly what to do when. They can look at something, smell it, feel it, and just know what is wrong and how to fix it. The rich soil is in their blood. As for me? I still get squeamish about anything creepy-crawly in the dirt.

So instead I "garden"... yes, the quotations make all the difference. It's more of just puttering around, seeing what works (and what doesn't), and a lot of online research, and I mean A LOT. Every single thing I do know about plants and "gardening" is from the web. My mom will openly admit that she has a black thumb and can't keep a houseplant alive. I think that is because all her focus and attention was on her kids and being a great mom. I have to admit that my own house plants suffered quite a bit when we first got Eva; I killed off five indoor herb plants. Thankfully we got into a routine just in time to plant my seeds for the season.


Before now, all the "gardening" I have done has been in containers. Last year we were in a Townhouse with no yard, so I covered the deck with large containers. (I think the moving guys thought I was nuts for asking them to move massive containers of dirt.) Since we bought our first house in November, this is the first time I am seeing this plant life popping up and my first stab at clearing and maintaining landscaping. I tend to take my mom's approach: low maintenance plants only and when in doubt, clear it out... it will come back if it was meant to grow there. I have no idea what these are (see picture to the left) but they cover the back yard beds. Daylillies maybe? Anyone have these?

So far I have cut down the ornamental grasses, cleared the kennel of all wood chips (so Eva can't bring them inside to chew on), trimmed a huge bush, and cut down another. Now we have a giant pile of branches stashed under our pine trees... I see building a fire pit in our near future!
The next step, besides raking out more of the beds, is to get three trees removed. I know, I hate cutting down mature trees, but these are through necessity. The first is a huge juniper of some sort that was planted two feet from the house... oh look, now it is growing into the house!

The second is probably a beautiful tree of some sort (haven't seen it with leaves on) but someone had the bright idea to plant it six feet from the house. Who does that?! Now it is scraping against the roof and gutters causing damage and eerie screeching noises on the windy nights. 


The third is a cottonwood shoot that is now 25 ft high and growing out of an old stump. Honestly I couldn't care less about this one other than the fact that it is planted right over the gas line... fun.


Don't worry, I am smart enough NOT to remove these trees myself. Anyone know of a good tree removal service? In the mean time I will be working on building a couple of raised beds for "gardening." I do need a place to put my tomato's after all!

Monday, April 15, 2013

Mudroom Part Three: Painting and Puppy!

My poor Dear Husband (DH), he has been so patient with me through this project. It has only taken me, ohhh 8 weeks or so of having the closet a disaster zone. (Oy!)
Here's why:
1. Remove the ugly wire shelves
2. Remove the plastic "Molly Bolt" wall anchors
3. Patch those holes and all other dings
4. Sand the walls down
5. Clean the walls (----> see cleared out closet with my photo-bombing helper, Eva)
6. Tape up plastic
7. Scrape off popcorn ceiling
8. Patch and sand ceiling
9. Tape off all the trim
10. Prime walls and ceiling
11.  Paint ceiling
12. Tape off ceiling
13. Color coat one
14. Color coat two
15. Touch up edges

... looking at that list I'm surprised it only took me 8 weeks!

Well, below is the finished product. The camera/computer makes the color look a bit more yellow-toned than it actually is. Just another reason to never pick out colors from a computer screen. The color I actually used was "Great Green" by Sherwin Williams. I really like the hue, but it might be a little dark for the laundry room, so I may just go with a lighter shade.
Look at that smooth ceiling, love it! (Stay tuned for the full reveal once I get everything installed!)


Take that, color-phobic me! I showed myself that I was brave and went bold!


What I forgot to share is that I got impatient after painting the ceiling and didn't let it cure before taping it off to paint the walls. This resulted in peeling of the paint with the tape and extra touch up work. Ah well, yet another lesson for patience. 

Well, during those 8 weeks of painting Eva has been busy too, and not just following me around!
She is just about five and a half months old, and a couple weeks ago she got spayed. Like the trooper she is, we picked her up the next day and she acted like nothing had happened, jumping and prancing all over.
She is a star in puppy class. She knows sit, down, stay, turn around, jump, shake, heel, and high five. We are working on "stand" and roll-over. She is still a little shy of playing with the other dogs, but after a while joins in on the fun.

Today I bought her a new toy. Five minutes after playing with it, it was in two pieces (more if you count the ones she probably swallowed.) Now, I know it was only $3 but I figure it is wasteful to just throw it out and besides, all toys deserve a second chance. So to the right is what it "should" have looked like, and below is after I "fixed it" (The green material was all torn up so I could only save the black.)


Aaaaaand 5 min after I gave it back, it ended up like this: (See photo to the right.) Please note that my sewing job held up and was NOT the part that ripped, thank you!

Hopefully later this week I will have pictures of the finished closet, and maybe even some of the seeds I started a few weeks ago. It is just starting to warm up here, and I am getting out to play in the yard whenever I can!


Sunday, April 7, 2013

Spring has Sprung! (Sort of...)


Ok, so it has been abnormally cold here, but according to our "usual" last frost date of May 4, (Zone 5) I have started my seeds!

A few weeks ago I planted grape tomatoes, cherry tomatoes, parsley, oregano, mint, and thyme.
I am also going testing out artichokes from seed this year, which should be interesting. I should have planted them a couple weeks ago, but couldn't find any seeds. Let's face it, who besides a crazy person like me tries to grow artichokes? So I had to order them online and started them a little late!

Anywho, this weekend was the first one that was warm enough to start gardening outside. Of course since we just bought our first house, it is taking me a bit to pick up all the right tools so I can actually do some yard work. Have you ever seen how a wheelbarrow fits inside of a Honda Civic? Want to?

 Poor B2 (that's my car's name) is really getting a workout this spring.

The project this weekend was planing my hops. No, not like a bunny hops... beer hops! (See the wiki: http://en.wikipedia.org/wiki/Hops) All you really need to know is that they are an important ingredient in beer, and they grow trellised on long vines (but they call them "bines" just to be confusing).
I tried them last year but failed miserably, and only 1 out of 6 grew. This year WILL be better!

Here is Dear Husband (DH) digging out the two ornamental grasses for me. Doesn't he look ruggedly handsome shoveling in his flannel shirt? (I think so)

Let me tell you, these grasses were a bear! They were VERY overgrown and I had to use a hacksaw to cut them apart! Each one probably took about an hour and a half to get out. Needless to say, the other seven are staying right where they are at for now.

So I found out we have very sandy soil, so I needed to add some nutrients. It just so happened that the previous home owner left four bags of garden soil hidden behind the shed, jackpot! So I mixed that with two bags of compost (had to buy at the store since I don't have my own pile going yet). Also thew in some slow release fertilizer, mixed it all together and planted the hops.
Hops grow from rhizomes, similar to iris flowers. Basically it is a large piece of root that sits pretty close to the surface and the "bines" come off of there. Now the funny thing about hops is that they can grow really fast. When mature (2-3 years) they can grow up to a foot in one day and end up around 20 ft! Since we don't want them sprawling across the lawn and Eva (puppy) chewing them up, you have to set up your trellis when you plant them.
Another funny thing about hops is that all you have to put up is a rope, and (after just a little encouragement) they will actually "climb" the rope as they go, winding themselves around it clockwise as they follow the sun! How cool is Mother Nature?


So here is a picture of the end product after an exhausting weekend:
You can see I set up 3 ropes (each rope has 3 plants below it). It is tough to tell from the picture, but the ropes actually extend over the deck and attach to the house, so as DH is grilling out in the summer he may just get a little shade as well.
I will post more pictures as they start to (hopefully) grow. I have got to be able to get at least 1 out of 9!